How To Use Tattoo Transfer Paper Effectively { Guide }
Finally, after what seemed like an eternity of searching, I discovered how to utilise tattoo transfer paper. If you don’t have the time or energy to do it yourself, I’ll tell you how.
There are several steps involved in creating a tattoo, starting with drawing your design on a piece of transfer paper.
Continue reading the article for a more in-depth description of how the process works. For your benefit, I’ve attempted to make everything as simple as possible.
When transferring tattoos with Thermographic Tattoo Transfer Paper
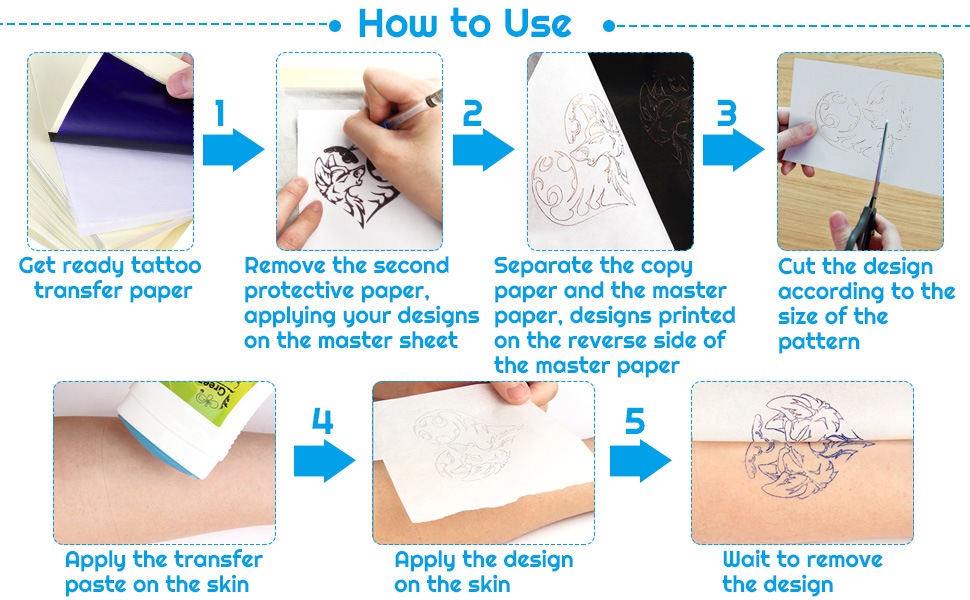
The majority of these transfer sheets include four layers of paper. The white layer is used to transfer the pattern to it. Then follows a thin layer of protection that is often discarded. It then has a yellow bottom layer to keep the pages in place, and the purple ink.
In order to utilise a thermographic transfer paper correctly, follow the directions below.
Make a pencil sketch of your idea.
Your skin design must be drawn on white printer paper using a pencil. The tattoo artist will utilise the image you provide, so make sure you are satisfied with the result.
Wait for it to be perfect because it’s a preliminary design to be transferred to your tattoo transfer paper.
Indent it into the transfer paper with your finger.
Slide your artwork into the tattoo transfer paper after you are pleased with it. Put it on top of the bottom layer, under the ink layer. The bottom layer helps to protect the paper from shifting.
Make use of a thermographic transfer maker to transfer the paper.
In certain tattoo parlours, you may find a thermographic transfer maker. They can also be purchased at several office supply retailers. Perhaps your tattoo artist already has one. Different types of the machine have different ways of doing the same thing.
You’ll get a carbon duplicate of your artwork on the tattoo transfer paper when you run it through this machine. Make sure your design is facing down, regardless of the model you’re using.
Clearly distinguish the carbon duplicate from the original.
Separate the top sheet of paper from the remainder of the tattoo transfer paper once you’ve got a perfect reproduction of your artwork on it. This is all you’ll need for the time being.
Using soapy water, moisten the skin.
The skin region where you want to transfer your tattoo outline should be wetted with soap and water. Make bubbles by using enough soap. Soap water can be used to soak a cloth, which can then be rubbed on the skin.
Dispose of the carbon copy in a soapy location
Put the copied copy in the exact spot where you want your tattoo to appear. Make sure the paper is not bent at the edges by repositioning it. Put the paper in place slowly. If at all feasible, get a second opinion on where things should go.
Having someone else perform the work for you is more efficient than doing it on your own.
To apply the picture to the skin, press it.
The carbon duplicate will emerge on your skin if you press on it with your hand. Patience is key in ensuring that you get a complete picture transfer from the paper to your skin.
Grab hold of the carbon copy and lift it.
The picture should be plainly visible on your skin when you gently raise the carbon copy. Put the carbon paper back in place and keep applying pressure to the paper if it doesn’t work out. The outline for your beautiful tattoo is ready when you remove the paper after the picture has been properly transferred.
If you aren’t satisfied with the image, you can change it.
Even if you follow the directions to the letter, there’s still a risk the picture won’t turn out as you had hoped. If you’re not satisfied with the picture, you may erase it off your skin with rubbing alcohol.
Rub the picture away with rubbing alcohol and a cotton ball. Afterwards, you may apply the picture on your skin using the same method.
Use Hectograph or Freehand Tattoo Transfer Paper to transfer tattoos
Hectograph transfer paper is a third form of tattoo transfer paper that is commonly used. Manual transfer paper, often known as free-hand transfer paper, is a popular alternative to iron-on transfers. Carbon copy sheets are used in the same way.
Multiple copies are often made with the use of hectograph transfer papers, which are comparable to the sheets used in earlier dot matrix printers and typewriters.
There are normally three sheets included in a package of free-hand transfer paper. Drawings will be done on the upper sheet. Before you begin, you should remove the thin centre layer. The bottom sheet will get your design. It comes in a variety of hues and has a carbon-like appearance.
Create a visual representation of yourself.
Use a hectograph pencil to ensure that your artwork is of the highest quality.
On the top layer, create your design. The bottom sheet will be copied. Place the design where you want the tattoo by cutting it out and sticking it to your skin.
Get your skin ready and then transfer it.
Before applying the paper, you will need to apply a stencil-stay solution to your skin. Once you are satisfied with the alignment, clean the paper several times with a moist sponge. Your pattern will appear precisely as you sketched it on your skin if you carefully peel the transfer paper.
Comparatively, the cost of hectographic transfer sheets is lower. Moreover, they are simpler to redo in the event of an error. A variety of colours are offered so that you may adapt the pattern colour to your skin tone more easily.
Using Crafts to Imprint Images
Tattoo transfer paper may also be used to transfer printed images onto any solid surface, such as plastic, wood, or metal. Make sure the object you’re working with has been well cleaned and dried.
Obtain a printout of your photo
Print out the design you want for a tattoo on a piece of paper. Adjust the size of your craft project to ensure that it fits in the frame. In order to make things easier, we’ll assume you have a piece of wood.
In craft stores, you may get printable tattoo paper. Even if your local retailers don’t carry it, you can always get it online.
Put on a sealant
Your tattoo paper will come with an adhesive sheet. A tiny coating of protection is applied to this adhesive sheet, as is the case with the others. Put the adhesive on top of your printed image by peeling off the protective covering. Cut the edges as closely as possible to the image now.
It’s time to remove the film.
Adhesive and plastic film are now sandwiched between two layers of material. Peel off the plastic covering to expose the adhesive layer underneath.
The picture should be placed on the item.
Place the paper precisely where you want it on the wood, with the picture side down. Remember that after you place the paper, you can’t move it back. Once the picture has been positioned, glue it down on the wood.
Use a damp towel.
Gently moisten the paper with a damp cotton cloth. Keep repeating this process until the entire sheet of paper is wet.
Peel off the paper
Gently peel the paper off the corner, starting at the bottom. Check to see if the picture has been transferred to the wood. Put the paper back in place and re-moisten it if the picture is coming off with it.
Spray the glaze with glaze spray.
Use glaze spray to secure the picture once it has been applied to the item. Your picture is protected from deterioration by the glaze. Before moving the object, allow the spray to dry for around 30 minutes.
Simply said, this is it.
People also ask
What solution do you use for tattoo transfer paper?
Make sure you have clean water – it should be clean enough that you get bubbles. Soap and water should work well. Dip a cloth in a cup of soapy water and then rub the tattoo gently.
Can you put tattoo transfer paper in a regular printer?
The tattoo transfer paper can be used with inkjet printers, and may work with laser printers as well, but should be tested by the user to be sure. The first thing you need to do is make sure your computer is connected to your printer.
Can you trace on tattoo transfer paper?
You can use tracing paper to get an outline of your permanent tattoo design onto your skin before you make the big decision to get a permanent tattoo.
In conclusion:
A tattoo is a constant friend for the rest of your life. Transfer paper ensures that your tattoo is precisely as you want it to look. You no longer have to worry about getting a tattoo and being dissatisfied with the final result since you can see it beforehand. In order to avoid subsequent regret, make sure your tattoo is flawless. Use only the best papers, no matter what kind you choose. The higher the quality of the paper, the better the picture quality will be on your skin.
Everything I could discover about tattoo transfer paper has been included in this guide. Hopefully, you were able to accomplish your goal.
For More Information Visit https://twoleftsticks.com/